|
<< Click to Display Table of Contents >> Create New Parametric Scan |
  
|
|
<< Click to Display Table of Contents >> Create New Parametric Scan |
|
To perform a new scan, you need to do the following Steps:
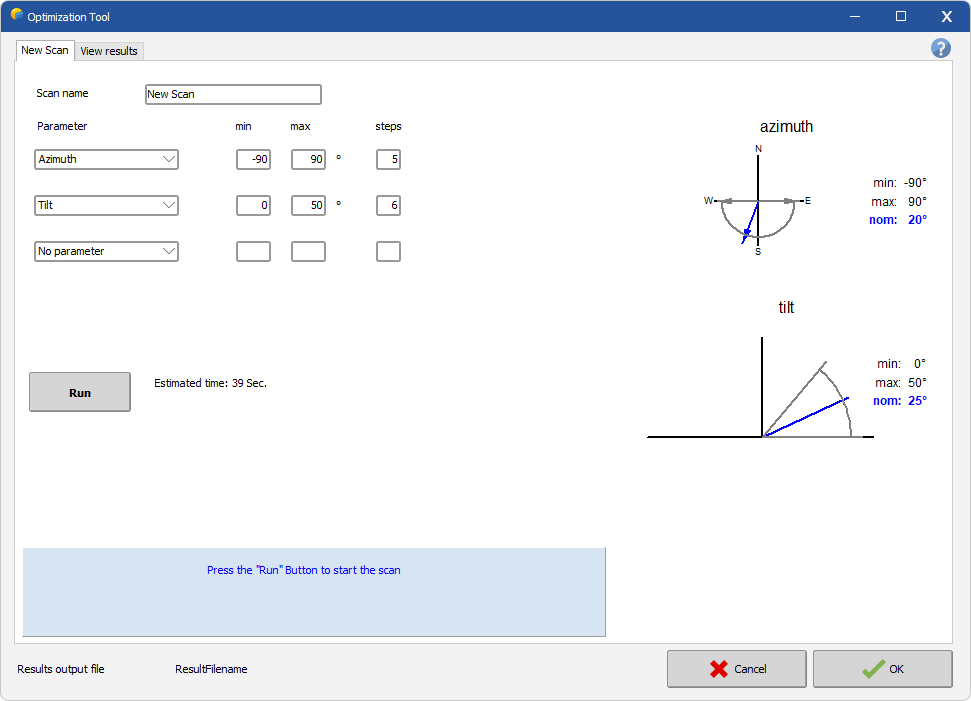
![]()
Enter a name for the scan that will be performed. This name will appear in the list of executed scans, once the scan is finished.
Use the combo-boxes on the left to select the parameters that should be used in the scan.
The available parameters depend on the type of project that is being used. The pitch parameter for example can be used only in projects where sheds are defined in the 3D near shadings.
The following parameters are available so far:
1.Tilt: This parameter is available for all projects with fixed tilt orientation or unlimited sheds.
2.Azimuth: This parameter is available for all projects with fixed tilt orientation or unlimited sheds.
3.Pitch: The pitch is the distance between two sheds (rows) of a PV installation. This parameter is available for projects where sheds are defined in the 3D near shading scene.
4.Ground Covering Ratio (GCR): In shed layouts, the GCR is defined as ratio of the width of the sheds and the pitch. This parameter is an alternative way to describe the Pitch.
For each parameter you have to define the start and end values (Min, Max) and the number of steps that should be performed. The sketches on the right side of the window visualize the selected parameter ranges. The start and end values are drawn in gray, and the value used in the underlying variant is marked in blue.
When all the scan parameters have been defined, check the estimated time display on the bottom, to get an idea of how long the scan will take. This estimate is based on the last execution of the simulation. If the variant has not been simulated yet, the time estimate will not be available. Depending on the number of steps that were chosen for each parameter, the scan time can become very long. In this case, consider reducing the number of steps for the parameters. To save time, you can go in several iterations, by performing first a coarse scan in large steps, and then perform the subsequent scans in a more narrow range of the parameters with smaller steps.
When parameter ranges and numbers of steps have been defined, click on 'Run' to start the scan. On the right side of the parameter definitions a column with title 'Current' will appear, displaying the parameter combination that is currently being simulated. A double progress bar will show how much of the overall scan and of the current scan step has already been processed.
If during a scan, a combination of parameters is such, that a simulation is not possible (e.g. a pitch that is too short for a given tilt angle), this scan step will be skipped. In the results viewer, this step will be omitted in the one-dimensional plots and be grayed-out in two-dimensional plots.
When the scan starts, the label on the 'Run' button will change to 'Abort'. When clicking on it, a confirmation dialog will pop up, and if confirmed, the scan will be aborted. Any results that were calculated up to then, will be lost.
Once the scan is finished, the dialog will switch automatically to the 'View Existing Scan' tab and the results will be displayed.